Hello,
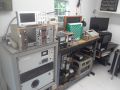
I started building a fusor in fall 2015.
Money being the “nerf de la guerre” (sinews of war), I believe it’s always important to remember that building a fusor isn’t cheap.
In almost three years I’ve spend around 2.000US$ in this endeavour plus 450US$ for port and import taxes.
I’m using US currency here as a common denominator and also to not discourage fellow Canadians with numbers inflated by the painful USD/CAD conversion rates these days.
Speaking of US/CA disparity, note that it’s cheaper to ask for delivery on the other side of the border and go get your package but it comes with having to explain to the customs agents on both sides what you are moving across (did you say nuclear?). Thus the use of this strategy depends as much on your wallet as it depends on your mood.
To date, the most expensive single part I bought has been the 6” spherical vacuum chamber (600US$) with three ports that luckily I found assembled on eBay last year.
Vacuum pumps and gauges were less than 200US$ each.
Aside from eBay, I bought at greater expense some stuff I prefer to have new (viewport and HV feedthrough), from LDS and KJ Lesker.
I started with the vacuum system because I believe it to be the most versatile part of a fusor (in case I changed my mind).
My vacuum setup is based on an used diffusion pump (maybe an Edwards) coming from ORNL (certified free of active radionucleides) backed by an Alcatel 2004A (patriotism obliges) two stages mech pump I had to patch.
The above-mentioned diffusion pump is cooled by a PC water-cooling setup I will have to improve.
Connections are mostly KF25 except on the vacuum chamber (2x2.75CF and 1.33CF) and diffusion pump (ISO-100).
Two valves isolates the pumps. One for rough vacuum and the other for high vacuum.
As there are only three ports on the vacuum chamber, deuterium will be fed via a double sided 2.75CF flange with side holes.
To get an idea of what’s going on inside, I was using an old CVC GTC-036 thermocouple at first but then came upon a nice Pirani gauge and it’s controller. I recently added an ion gauge (W filaments) to that same controller to test more thoroughly the whole assembly performances.
To date, min pressure measured was 5.5E-6 Torr after two hours of pumping. Given more time it could certainly go lower. Leak rate, HV valve closed, was about 3E-3 Torr/min and stable after four pump runs.
The whole thing is held in place by an Ikea kitchen cart. I’m not the first one to use this culinary tool for a high vacuum system since I took the idea from the Applied Science guy on YouTube.
This arrangement being now operational, I’m focusing on the deuterium and electric sides of the project.
Neutrons detection will be the last step but for once it should be cheaper than usual given that bubble detectors are coming from Ontario.
If everything goes according to plan I should be able to fuse some nuclei before the end of 2018.
Fusor progress, Antoine Fleitz
-
Antoine Fleitz
- Posts: 4
- Joined: Wed Jun 20, 2018 10:53 pm
- Real name: Antoine Fleitz
- Location: Montreal, QC, Canada
Fusor progress, Antoine Fleitz
You do not have the required permissions to view the files attached to this post.
-
Dennis P Brown
- Posts: 3190
- Joined: Sun May 20, 2012 10:46 am
- Real name: Dennis Brown
Re: Fusor progress, Antoine Fleitz
Very nice setup and your approach is logical - you are correct that the vacuum system is the most versatile - one can do metal coatings or sputtering with these systems.
Getting a proper electrical supply can be involved but far easier than the neutron detection system (of course, one can buy a turn key system - which can be a good approach, too (I did the neutron detection system both ways - lol. That is, I first built my own system and it worked great; that is, until it didn't! Then realized the work I was putting in wasn't worth my time any more and I had other experiments that needed my attention.)
Deuterium gas via heavy water has been successful for a number of people here.
Best of luck with the rest of the build - it is worth the effort to get the neutrons!
-
Antoine Fleitz
- Posts: 4
- Joined: Wed Jun 20, 2018 10:53 pm
- Real name: Antoine Fleitz
- Location: Montreal, QC, Canada
Re: Fusor progress, Antoine Fleitz
Thanks Dennis,
Since July I finished building the power supply.
My system is based on Andrew Seltzman's build (with less meticulousness).
The supply is a centre-tapped dental X-ray transformer capable of 100kV (the same he used) sandwiched between 2x2 polyethylene plates.
Yesterday I assembled the whole system (minus the deuterium) together and got my first plasma.
A GoPro connected via WiFi was used to film the inside of the reactor.
Pressure was above 15mTorr (only mech pump was used & 8' copper gasket is leaky) and voltage at 1.5kV (measured by the HV probe). Now I will have to learn how to operate the system and empirically understand plasma behaviour.
I also have a deuterium gas generator to build.
You do not have the required permissions to view the files attached to this post.
-
Rich Feldman

- Posts: 1472
- Joined: Mon Dec 21, 2009 6:59 pm
- Real name: Rich Feldman
- Location: Santa Clara County, CA, USA
Re: Fusor progress, Antoine Fleitz
Looking good there, Antoine.
Looks like a fusor-style plasma is the only electrical load you need. Did you ever test your power supply with a resistive load? There are some threads on fusor.net about how to do that without breaking the budget. Could be as simple as water in a plastic pipe or hose. One of my "started" projects is a load using normally procured new resistors, to explore low cost-per-watt territory.
Please tell us about "vacuuming" your oil pail. How did the plastic lid and flat metal bottom hold up? Was it inside a larger tank?
All models are wrong; some models are useful. -- George Box
-
Antoine Fleitz
- Posts: 4
- Joined: Wed Jun 20, 2018 10:53 pm
- Real name: Antoine Fleitz
- Location: Montreal, QC, Canada
Re: Fusor progress, Antoine Fleitz
I didn't tested my supply with a resistive load.
About vacuuming. The bucket is all plastic and contracted when vacuumed. The lid deformed and the rough pump started sucking mineral oil so I had to maintain the vacuum hose extremity just a mm above the hole and close the rough vacuum valve a bit. Let’s say it was mildly vacuumed for one hour until I gave up on that idea and let everything just soak since I had to wait for parts anyway.
Inside a larger tank is a great idea.