Vacuum Chamber Construction
-
Dennis P Brown
- Posts: 3190
- Joined: Sun May 20, 2012 10:46 am
- Real name: Dennis Brown
Re: Vacuum Chamber Construction
Very pleased to hear it all worked out - both literally and figuratively.
-
Nicolas Krause

- Posts: 232
- Joined: Fri Sep 30, 2016 7:36 pm
- Real name: Nicolas Krause
- Location: Canada
- Contact:
Re: Vacuum Chamber Construction
Just a quick update. I've got the chamber all assembled, and sitting on its frame. While I'm sure in the future I'll like having so many ports, at the moment it's mostly a lot of tedium anytime I try and put it all together. This is the second time putting it together today as earlier I was nearly done, but ran into some problems again with bolts biting into threads on the top port. Rather than fuss about with it, I disassembled the top half and drilled out the threads on every hole up top. Don't have to worry about that problem again! Tomorrow I plan on tightening up all the bolts, and pressurizing the chamber with a bike pump I have handy. I'll use a soap and water solution on the joints to check for any major leaks.
-
Dennis P Brown
- Posts: 3190
- Joined: Sun May 20, 2012 10:46 am
- Real name: Dennis Brown
Re: Vacuum Chamber Construction
Your system looks absolutely professional and you've obviously become an expert machinist, as well. I'd find it hard to believe that you'll see any leakage using pressure/soap because that system is too well made to exhibit any significant leaks. Look forward to your further posts.
-
Richard Hull

- Moderator
- Posts: 15037
- Joined: Fri Jun 15, 2001 9:44 am
- Real name: Richard Hull
Re: Vacuum Chamber Construction
I'm glad you took my advice on just drilling out those threads to make it thru-hole. Threads are great and even demanded in tight or ill-designed conflat mountings, but plain holes with clearance warrants that a bolt that is snapped off in no problem. A messed up nut just be cut off without having the hassles you have had with stripped or damaged threaded flange holes. In addition, thru-holed flanges are cheaper.
My motto is design with clearances so you can use common hardware bolts, if you can, and use thru-hole flanges.
Richard Hull
My motto is design with clearances so you can use common hardware bolts, if you can, and use thru-hole flanges.
Richard Hull
Progress may have been a good thing once, but it just went on too long. - Yogi Berra
Fusion is the energy of the future....and it always will be
The more complex the idea put forward by the poor amateur, the more likely it will never see embodiment
Fusion is the energy of the future....and it always will be
The more complex the idea put forward by the poor amateur, the more likely it will never see embodiment
-
Rich Feldman

- Posts: 1471
- Joined: Mon Dec 21, 2009 6:59 pm
- Real name: Rich Feldman
- Location: Santa Clara County, CA, USA
Re: Vacuum Chamber Construction
Anybody here using nut plates instead of single nuts, to use fewer wrenches and lockwashers?
https://apexvacuum.com/product/conflat- ... late-nuts/
- CF-Flange-Plate-Nuts.png (75.69 KiB) Viewed 10194 times
All models are wrong; some models are useful. -- George Box
-
Frank Sanns
- Site Admin
- Posts: 2124
- Joined: Fri Jun 14, 2002 2:26 pm
- Real name: Frank Sanns
Re: Vacuum Chamber Construction
I use those on my 2.75" flanges. They work great especially since I have so many connections of that size.
Achiever's madness; when enough is still not enough. ---FS
We have to stop looking at the world through our physical eyes. The universe is NOT what we see. It is the quantum world that is real. The rest is just an electron illusion. ---FS
We have to stop looking at the world through our physical eyes. The universe is NOT what we see. It is the quantum world that is real. The rest is just an electron illusion. ---FS
-
Richard Hull
- Moderator
- Posts: 15037
- Joined: Fri Jun 15, 2001 9:44 am
- Real name: Richard Hull
Re: Vacuum Chamber Construction
I use them on all my 2.75 conflats just like Frank. They are a real time saver, but at $6 or more per set of 3, I have never bought any as regular nuts are just fine. All that I have came off a number of surplus system disassembly efforts in the past. I guess I have about 4 full sets on hand. I used them on the abortive fusor V alpha. Now dismantled, I have them all at my disposal once again. I have 100's of nuts on hand. These plate nuts are handy for through hole flanges where a wrench to be placed on a nut for tightening is almost impossible to get to. They do serve a glorious purpose at times. To conserve the few I have, I have been known to use one in tight spaces and 4 regular bolts and nuts on the easier to reach parts of a flange. There are no vacuum police to regulate how they are used.
As far as I think, based on what I have and need in future, I'll probably never have to actually purchase any plate nuts.
Richard Hull
As far as I think, based on what I have and need in future, I'll probably never have to actually purchase any plate nuts.
Richard Hull
Progress may have been a good thing once, but it just went on too long. - Yogi Berra
Fusion is the energy of the future....and it always will be
The more complex the idea put forward by the poor amateur, the more likely it will never see embodiment
Fusion is the energy of the future....and it always will be
The more complex the idea put forward by the poor amateur, the more likely it will never see embodiment
-
Nicolas Krause
- Posts: 232
- Joined: Fri Sep 30, 2016 7:36 pm
- Real name: Nicolas Krause
- Location: Canada
- Contact:
Re: Vacuum Chamber Construction
Dennis I appreciate the kind words, but reality is a harsh mistress. Looks like I'm going to be redoing some of the welds!
-
Nicolas Krause
- Posts: 232
- Joined: Fri Sep 30, 2016 7:36 pm
- Real name: Nicolas Krause
- Location: Canada
- Contact:
Re: Vacuum Chamber Construction
I was concerned about missing leaks on the underside of the chamber since a lot of the soap solution had dripped off, so I just completed a second leak test in the bathtub. Virtually all of the leaks appear to be coming from one of the main rings on the hemisphere. I'm unable to see any other bubbles from the underside to that's nice, there were also a couple of small leaks from some conflat seals I evidently hadn't tightened enough.
-
Rich Feldman
- Posts: 1471
- Joined: Mon Dec 21, 2009 6:59 pm
- Real name: Rich Feldman
- Location: Santa Clara County, CA, USA
Re: Vacuum Chamber Construction
Good clean toes. 
Assuming the main ring welds aren't leaking ...
Is it possible that a thick steel ring was rendered non-flat, beyond tolerance, by the welding operations?
I guess that could be checked by assembling without Cu gasket, all bolts finger tight, and check the joint all the way around with thin feeler gauge.
Would an elastomeric seal tolerate more non-flatness than traditional copper ring?
All models are wrong; some models are useful. -- George Box
-
Nicolas Krause
- Posts: 232
- Joined: Fri Sep 30, 2016 7:36 pm
- Real name: Nicolas Krause
- Location: Canada
- Contact:
Re: Vacuum Chamber Construction
Hi Rich, the bubbles are very clearly coming from the connection of the hemisphere to the ring, and the hemisphere's don't rock against one another when I press them together, so I think the most likely culprit at the moment is the weld itself.
-
Nicolas Krause
- Posts: 232
- Joined: Fri Sep 30, 2016 7:36 pm
- Real name: Nicolas Krause
- Location: Canada
- Contact:
Re: Vacuum Chamber Construction
Very happy to report that after a quick welding session, the welds appear to be sound. Visual inspection identified a couple of small holes, and just to be on the safe side I welded a few more spots that looked suspect. I repeated the soap and water test with the bicycle pump and no bubbles appeared! Next steps are to complete the program and pcb for my vacuum thermocouple gauge. I'll then be able to hook up my backing pump.
-
John Futter
- Posts: 1850
- Joined: Wed Apr 21, 2004 10:29 pm
- Real name: John Futter
- Contact:
Re: Vacuum Chamber Construction
Nicolas
Excellent keep at it
Excellent keep at it
-
Nicolas Krause
- Posts: 232
- Joined: Fri Sep 30, 2016 7:36 pm
- Real name: Nicolas Krause
- Location: Canada
- Contact:
Re: Vacuum Chamber Construction
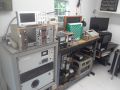
Progress has been slower than I'd liked this summer. I'm still waiting on some parts to complete my thermocouple gauge sensor. The pandemic has slowed mail delivery considerably. In the meantime I've added some bits to the chamber and its starting to look operational. The mechanical backing pump works just fine but until I complete the vacuum gauge there's not much sense in pumping the chamber down. The vacuum line consists of two valves, a ball valve at the mechanical pump and a butterfly valve at the turbopump. In addition I have most of the components for the high voltage feedthrough either delivered or on order.
-
Richard Hull
- Moderator
- Posts: 15037
- Joined: Fri Jun 15, 2001 9:44 am
- Real name: Richard Hull
Re: Vacuum Chamber Construction
It is looking super professional and you have what it takes! You have shown it through your numerous reports as those baby steps were taken. This is something you will long remember and be proud of, not so much of the finished product, but of the struggle and effort. You have proved something to yourself about yourself.....That will last.
Oh, I am green with envy over that beautiful blue anodized lab build frame. WOW! In case you haven't noticed, I like blue around my fusor. I dare not think of what that frame and all the bits and pieces set you back.
Richard Hull
Oh, I am green with envy over that beautiful blue anodized lab build frame. WOW! In case you haven't noticed, I like blue around my fusor. I dare not think of what that frame and all the bits and pieces set you back.
Richard Hull
Progress may have been a good thing once, but it just went on too long. - Yogi Berra
Fusion is the energy of the future....and it always will be
The more complex the idea put forward by the poor amateur, the more likely it will never see embodiment
Fusion is the energy of the future....and it always will be
The more complex the idea put forward by the poor amateur, the more likely it will never see embodiment
-
Nicolas Krause
- Posts: 232
- Joined: Fri Sep 30, 2016 7:36 pm
- Real name: Nicolas Krause
- Location: Canada
- Contact:
Re: Vacuum Chamber Construction
Up here in the great white north, shipping adds considerably to any sort of industrial components I've attempted to purchase. I got my stand from a company in montreal called Vention. They have a web setup for designing automation and machine tending applications for factories. A large component of that is obviously extruded aluminum frames. You can see my stand here https://vention.io/designs/70204. The price in canuck bucks was about $770, which in USD would probably be closer to $500 even. It's not cheap, but it's a good stand, was easy to use their web interface to design and the price was comparable to all the others I looked at.
-
Richard Hull
- Moderator
- Posts: 15037
- Joined: Fri Jun 15, 2001 9:44 am
- Real name: Richard Hull
Re: Vacuum Chamber Construction
Ouch!! I was looking at 1010 or 2020 extrusion hardware and I could duplicate your frame in normal un-anodized aluminum for about $200 as bits and pieces parts from Amazon with bits and pieces left over!
https://www.amazon.com/80-20-Inc-T-Slot ... B001F0F112
I would do this in a heartbeat if I was to make fusor VI..... should I live so long. All just screw driver or cap-head screw assembly. I already have some 1010 extrusion at the lab that I found at our local scrap yard but not quite enough to complete a full frame. So I might need about $60.00 worth of new extrusion and $50 or more worth of the special insert nuts and cap screws with some link fittings to build a frame.
Richard Hull
Progress may have been a good thing once, but it just went on too long. - Yogi Berra
Fusion is the energy of the future....and it always will be
The more complex the idea put forward by the poor amateur, the more likely it will never see embodiment
Fusion is the energy of the future....and it always will be
The more complex the idea put forward by the poor amateur, the more likely it will never see embodiment